


The first time I saw someone doing the dead bug exercise in a gym, I honestly thought they’d lost the plot. There they were, flat on their back, arms in the air, legs waving around like an upside-down beetle. I nearly laughed. Then my physio prescribed the exact same move two weeks later — and it humbled me fast.
Here’s the thing: most core training is backwards. We train our abs to crunch forward, but sport almost never asks your trunk to do that. It asks your trunk to stay rock-solid while everything else moves — when you sprint, when you land a jump, when you throw. That’s exactly what the dead bug trains, and it’s why this ridiculous-looking move has quietly become a staple for athletes, physios, and strength coaches.
What the Dead Bug Exercise Actually Is
The dead bug is an anti-extension core exercise. Fancy term, simple idea: you lie on your back and move your arms and legs while your spine stays perfectly still.
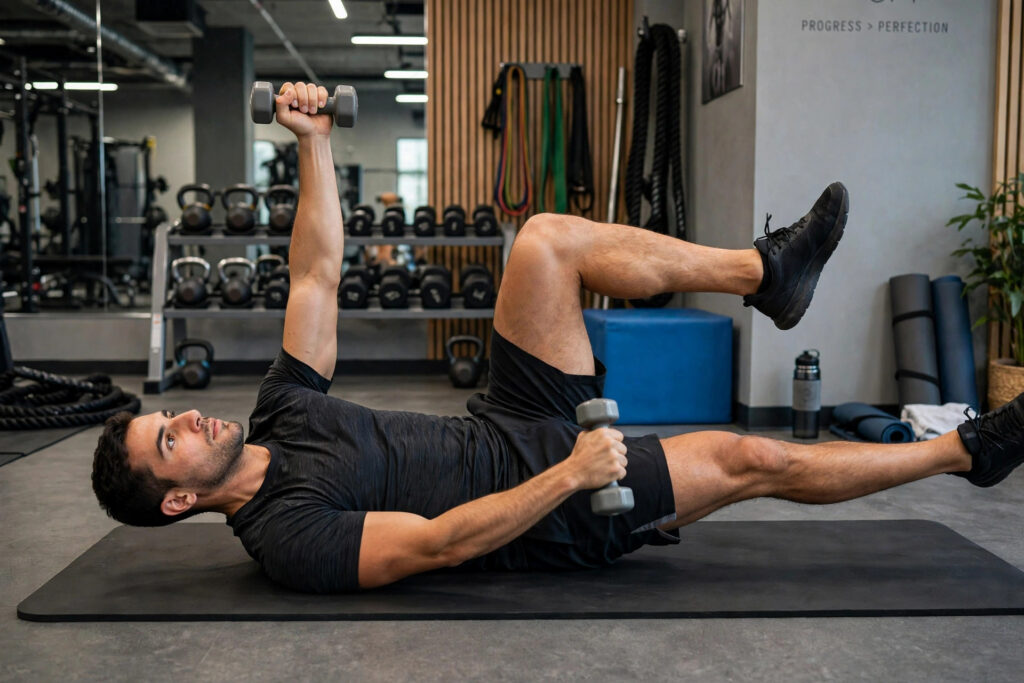
You start with your knees stacked over your hips and your arms pointing at the ceiling. Then you slowly extend one arm overhead and the opposite leg out in front of you, hover for a beat, and come back. Your lower back never leaves the floor. That’s the whole job — and it’s much harder than it sounds.
The muscles doing the work aren’t just the “six-pack” ones. The deep transverse abdominis acts like a corset around your midsection, the obliques on your sides fight rotation, and the rectus abdominis keeps your ribs from flaring. Together they form a pressurised canister that braces your spine. When that canister is weak, your back arches, your hips rock, and force leaks out of every movement you make.
Why It Works Better Than Crunches for Athletes
Crunches aren’t evil, but they train one narrow pattern: bending your spine forward under load. Running, lifting, and cutting on a field demand the opposite skill — resisting movement. The dead bug trains that skill directly.
The research backs the idea up, with honest limits. In a six-week study of 29 untrained young adults, the dead bug group improved core strength, endurance, and flexibility more than both a crunch group and a control group. That’s a small study on beginners, so don’t treat it as gospel — but it’s a real result, not gym folklore.
Electromyography research adds another useful detail. In one study of 30 healthy adults, moving the arm and leg together produced significantly greater activation in the rectus abdominis and both oblique muscles than moving only the arms or only the legs. Translation: the full version is worth doing, not just the easy half of it. And in a study comparing muscle activation across Pilates mat exercises, the dead bug activated the obliques more than the deep spinal muscles — exactly the pattern you want for a stable, braced trunk.
How to Do the Dead Bug Exercise Step by Step
Slow down. Speed is the enemy here. If you can blast through 20 reps, you’re not doing it right — you’re just flailing.
- Lie on your back on a mat, knees bent, feet flat.
- Lift your legs into tabletop: hips and knees both at 90 degrees, shins parallel to the floor.
- Reach both arms straight up so your hands sit directly over your shoulders.
- Gently press your lower back into the floor. Not jammed down hard — just enough that you couldn’t slide a hand underneath.
- Exhale slowly as you extend your right arm overhead and your left leg out in front of you, hovering both just above the floor.
- Pause for one second, inhale, and return to the start with control. Repeat on the other side.

That’s one rep per side. Aim for 3 sets of 8 per side, with about 3 seconds on the way out and a one-second pause at the bottom. If your back arches at any point, you’ve gone too far — shorten the range until you can hold position.
5 Mistakes That Ruin the Dead Bug
Most people do this exercise wrong in the exact same five ways. Fix these and the move transforms overnight.
Your back arches off the floor. This is mistake number one, and it cancels the whole point. The moment your lower back lifts, your core has stopped working and your hip flexors have taken over. Shorten your range until your back stays glued down.
You rush it. The dead bug is a control drill, not a cardio drill. If your limbs are whipping around, your core isn’t learning anything. Three seconds out, one second hold, three seconds back — boring, and brutally effective.
You hold your breath. Bracing doesn’t mean clamping down and turning purple. Exhale as you extend, inhale as you return. That breathing pattern is half the training: it’s how your diaphragm and deep core learn to work together under load.
Your ribs flare. Watch your chest. If your ribs pop up toward the ceiling as your arm goes back, your spine is extending even though your lower back looks flat. Think about keeping your ribs “down and in” the whole time.
Your hips rock side to side. Your pelvis should stay level like a bowl of water you refuse to spill. If one hip drops every time a leg extends, you’re not ready for the full range yet — go back to the easier version below.
Your 4-Week Dead Bug Progression
Here’s a simple plan that actually works. The rule for every week: only move on when you can finish every rep with your back flat and your breathing steady. No exceptions, no ego.
Week 1 — legs only. Arms stay pointing at the ceiling while you extend one leg at a time. 3 sets of 8 per side, every other day.
Week 2 — the full move. Opposite arm and leg together, same slow tempo. 3 sets of 8 per side. This is the version most athletes should live on for a long time.
Week 3 — slow tempo. Take 4 seconds to extend, hold 2 seconds at the bottom, 2 seconds back. Drop to 3 sets of 6 per side — the slower speed makes it much harder.
Week 4 — extended range or light load. Either lower your limbs closer to the floor, or hold light dumbbells (1–2 kg) in your hands. 3 sets of 8 per side. If your form breaks, drop back a week — that’s progress, not failure.
Where to Put It in Your Training Week
Two or three sessions a week is plenty, and placement matters. The dead bug works best as part of your warm-up, right after your 15-minute foam rolling routine and before your main lifts or run. It wakes up the deep core so it’s actually firing when you train, rather than being an afterthought tacked on at the end when you’re tired.
It also pairs naturally with functional fitness exercises, because both train the same idea: strength you can actually use in real movement, not just in the mirror. And if you train hard, slot it into your post-workout recovery routine on lighter days — it’s low-fatigue work that still builds the stability your next session depends on.
Is the dead bug exercise safe if my back hurts?
It’s widely used in rehab settings precisely because it keeps the spine neutral, but “widely used” is not the same as “right for you.” If you have a diagnosed disc problem, recent surgery, or sharp pain during the move, stop and talk to a physio or doctor before continuing. Pain is information, not something to push through.
How many dead bugs should I do?
For most athletes, 3 sets of 6–10 reps per side, two or three times a week, is the sweet spot. Quality beats quantity so hard here that it’s almost a different exercise: 6 perfect reps will do more for you than 20 sloppy ones. When all your reps look clean and easy, progress using the 4-week plan above instead of just adding reps forever.
Will dead bugs give me visible abs?
Honestly? Not on their own. Visible abs are mostly about body fat, and no core exercise changes that. What dead bugs will give you is a stronger, more stable midsection — better posture, a braced trunk under load, and a core that actually supports your sport. That’s the part that matters for performance, even if it doesn’t photograph as well.
The Takeaway
The dead bug looks silly, and that’s probably why so many athletes skip it. But strip away the funny name and you’re left with one of the most useful core drills there is: it trains your trunk to stay stable while your limbs move, it works the deep muscles crunches barely touch, and it scales from total beginner to loaded athlete without ever needing a machine.
Try it tonight. Lie down, press your back into the floor, and extend one arm and the opposite leg as slowly as you can. If your back pops up within three reps, congratulations — you just found the leak in your core. Now you know exactly what to fix.
This article is for general information only and isn’t medical advice. If you have back pain, a spine condition, or a recent injury, check with a qualified healthcare professional before starting a new exercise.